Below are notes – mostly for me – on trying to get a KnockoutJS/MVVM/EF6 going with an existing database. I’m not going to presume that what I attempted is impossible, but for now I’m stepping back from MVVM and going to MVC/EF6. Here’s why.
I’ll cut things short and give it to you straight. You’ll find most of the webAPI samples you see out there are code-first. I think there’s a reason for that. For MVC applications, maybe a straight up EF6 model, database-first, is the way to go – with Linq to SQL. There it is, for now.
Walkthrough
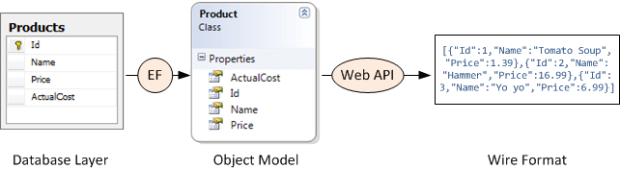
Here’s the general pattern I as going for: (Thanks Mike Wasson, you rock!)

In more detail – we’d like a wire format like the following. This works, just great, if you follow Mike’s article below explicitly, and use POCO code-first approach. It bogs down, as we’ll see, with db-first.
In review: Knockout.js is a Javascript library that makes it easy to bind HTML controls to data. Knockout.js uses the Model-View-ViewModel (MVVM) pattern.
- The model is the server-side representation of the data in the business domain (in our case, products and orders).
- The view is the presentation layer (HTML).
- The view-model is a Javascript object that holds the model data. The view-model is a code abstraction of the UI. It has no knowledge of the HTML representation. Instead, it represents abstract features of the view, such as “a list of items”.
The view is data-bound to the view-model. Updates to the view-model are automatically reflected in the view. The view-model also gets events from the view, such as button clicks, and performs operations on the model, such as creating an order.

Our goals:
- Build a SPA and be able to log in with our SQL db
- Demonstrate ability to fire off a sproc to create a serial number
- Admin tools – Basic editable view of Processes and Steps.
- Display, entry and validation of a basic workflow on one process in buildHistory.
To do this I tried the following steps:
- Created a new ASP.NET website using the Single Page Application template.
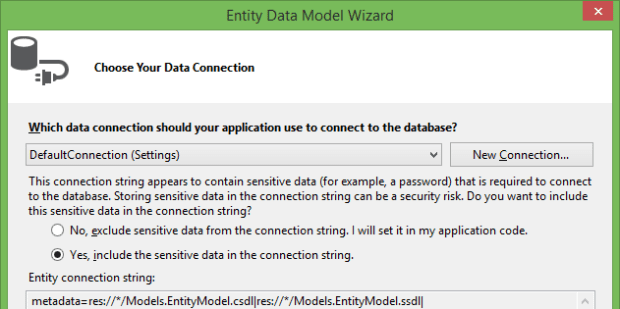
- Changed the database connection to point to my SQL database. This has a set of tables we’ll need populated (AspNetUsers, Roles, etc.)
- Built and tried to log in – successful!
- Create a subfolder off Models called AutoGenerated and right click on it to add a new model to your existing db:
-

You’ll see the following:
Go through ProductType.cs and copy and paste it to the main Models folder. Then go nuts on it. Add a reference to System.ComponentModel.DataAnnotations, and add some attributes. Make the ID fields so they don’t scaffold; add some Required attributes, etc.

There’s all kinds of cool things you could do above. Add CustomValidationAttributes, link to enums for dropdown lists, data type attributes, rangeattributes, regular expression and string length validators… the world is your oyster. Side note – I saw a ref to System.ComponentModel.DataAnnotations in the project, but couldn’t refer to it in the class. Turns out, when I chose the SPA template as my starting point, it was pointed to an older .NET framework version – .NET 4.5 versus .NET 4.5.1. Big difference!
Then go into App_Start and add events using Entity Framework for the Product class.

Build. You’ll need reflection to be up to date for the next step.
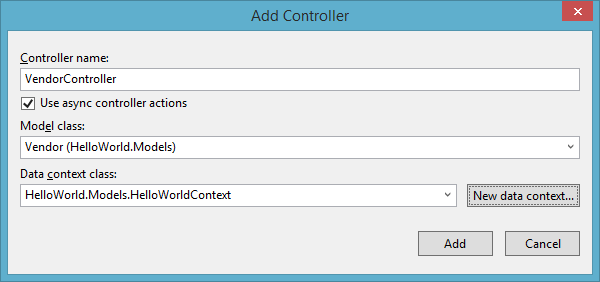
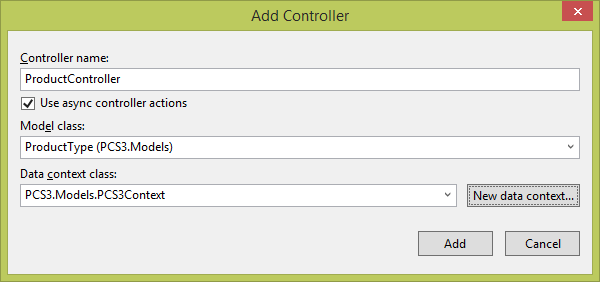
Now, right click on Controllers, and select Web API 2 Controller with actions, using Entity Framework.

In the next screen enter a good logical name for your Controller. Here I’m shortening the table to Product. Below I clicked on the new data context button – but don’t do this, just use the context you used with EntityFramework that’s already in your web.config.
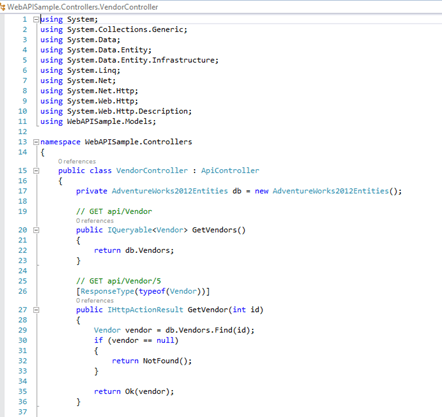
Build it in your browser. Log in, and click on the API menu item. Look at the snazziness! Your new Product API class is available and – does it serve up data?
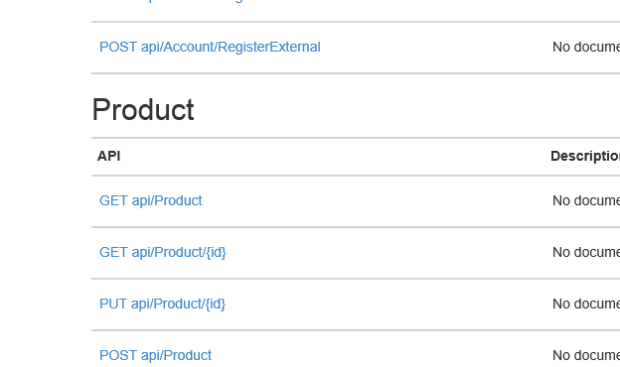
Punch in {yoursitename}/api/Product, and voila – hot steaming cup of JSON! (And, turns out, not so much – when I added new entities to the model, it returned EVERYTHING.)
Side Note
Trying to create a model initially didn’t show asynchronous methods available, which I favor. EntityFramework didn’t show in NuGet. However, running Install-Package EntityFramework in PackageManager Console did the trick. Now I see the following:

However, I’m still not getting reliable results. WebAPI, you’re out of time… for now. Sorry, would have been terrific if it was truly code-first.
In Summary
So, very frustrated. I think I’m trying to beat a square peg into a round hole. I’m getting [] JSON responses on my web services. Code that SHOULD work doesn’t; I honestly think WebAPI is meant for code-first/POCO approaches. There’s LOTS of examples, some very elaborate, of getting WebAPI to work – I’m thinking in particular this one and this one – without an existing db. But EF generated entities just aren’t working for us with a db-first approach. I’m running out of time; bagging it, and going with what I do know works – EF6, MVC generated controllers, so long MVVM/KnockoutJS. Simply put I don’t think we can guarantee delivery in the time the client demands at this point.
Helpful Links and References
- A good article here: http://www.mytecbits.com/microsoft/dot-net/knockout-js-and-bootstrap-with-asp-net-mvc-part-1. This article seems like it SHOULD work, but I find the database update does NOT work. Yuck.
- DO THIS – CodePlex article, not well written, but I found it good – http://ddmvc4.codeplex.com/
- the KnockoutJS tutorial site is good: http://learn.knockoutjs.com/#/?tutorial=intro
- Mike Wasson’s contacts SPA writeup is excellent – http://www.asp.net/web-api/overview/creating-web-apis/using-web-api-with-entity-framework/using-web-api-with-entity-framework,-part-1
- And his KnockoutJS writeup is also great. It’s also out of date. Just use the SPA template as a starting point; it doesn’t have the ToDo scaffolding anymore: http://www.asp.net/single-page-application/overview/introduction/knockoutjs-template
- A great and very opinionated article on AngularJS. http://www.codeproject.com/Articles/709340/Implementing-a-Flowchart-with-SVG-and-AngularJS
- This is an excellent writeup including using the Repository pattern with a MVC frontend, focusing in particular on Entity Framework: http://www.asp.net/web-forms/tutorials/continuing-with-ef/using-the-entity-framework-and-the-objectdatasource-control,-part-1-getting-started
- http://weblogs.asp.net/jgalloway/archive/2011/02/24/generating-ef-code-first-model-classes-from-an-existing-database.aspx – Not web api. Again, uses a good example of generating an EF model from existing db – and then copying it into another project for consumption (so it doesn’t get ripped up your next compile).
- A ton of examples here – http://msdn.microsoft.com/en-us/data/ee712907#efdesigner – all EF side.
- http://msdn.microsoft.com/en-us/data/dn468673