Here’s a link to the TryOutMVVM project. Enjoy!
There’s a ton of links at the bottom of the page, but in terms of best explanation/clearest walkthrough it’s hard to beat this one as a template. Skip past all the Azure propaganda – about halfway down is where the good stuff is at.
WebAPI is super cool and allows us to do things that the “old” WCF data services only dreamed of – such as returning nested (hierarchical) tables, etc. These days I find it difficult for us to justify building a data layer on anything else. The thrill of being set free from procedural logic/sprocs, I can’t even express!
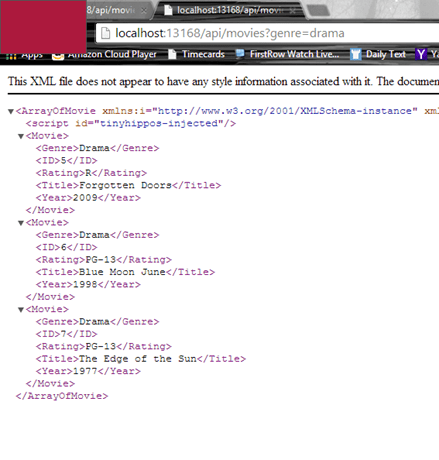
Here’s a sample return from a WebAPI. (JSON could be set up just as easily.) What’s involved in getting this set up? And can we mess around with linking it up to a web frontend and, I don’t know, sprinkle on some KnockoutJS for asynchronous goodness?
Let’s start with a few words on MVVM versus MVC
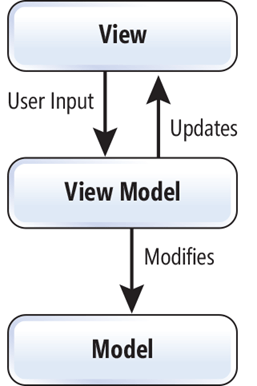
In terms of design MVVM is a logical extension of MVC. Model-View-Controller works off abstraction, where the model layer is unaware – completely uncoupled – of the view layer. In MVC, the Controller does all the work for this – and is responsible for determining which View is displayed in response to any action including when the application loads.

MVVM in contrast uses the ViewModel layer as a concept. It includes three key parts:
Model(Business rule, data access, model classes)View(User interface)ViewModel(Agent between view and model)
Here the ViewModel acts as an interface and …
- provides data binding between
Viewandmodeldata. - handles all UI actions by using commands.
In MVVM, the ViewModel does not need a reference to a view. The view binds its control value to properties on a ViewModel, which, in turn, exposes data contained in model objects.
Let’s walk through what it will take to implement a one-table MVVM app:
- Create a new MVC project, and enable both Webforms, MVC and Web API. Call it “ContactManager”.
- Modify _Layout.cshtml with contents (see zip file)
- Add a Contacts.cs class in Models folder, and Ctrl-F5 to build. EF uses reflection so these periodic builds will be necessary.
- Add a controller. Select MVC Controller with R/W actions Using EF. Call it HomeController; use the Contact model class, and select a <New data context>.
-
In the Tools menu, open up Package Manager Console. At the prompt enter:
- enable-migrations (since we have multiple contexts, enable–migrations -ContextTypeName
ContactManagerContext)
- add-migration-initial
- enable-migrations (since we have multiple contexts, enable–migrations -ContextTypeName
- Open up Migrations\configuration.cs, and add the code in the zip file. (this fills in the seed method to populate the database)
- Back to Package Manager Console, enter: update-database
- Build.
- Replace index.cshtml
- Add a Contacts.css style sheet to the Content folder.
-
Add a line to the App_Start\Bundle.config to register knockout.
- bundles.Add(new ScriptBundle(“~/bundles/knockout”).Include(“~/Scripts/knockout-{version}.js”));
- bundles.Add(new ScriptBundle(“~/bundles/knockout”).Include(“~/Scripts/knockout-{version}.js”));
- Add a Web API Controller with R/W actions Using EF. Call it ContactsController. Select Contact for the model, ContactManager context.
- Now build it, Ctrl-F5. Check out the new Home controller, at {yourappurl}/api/Contact.
That’s just a quick overview. In more detail, let’s go thru this step by step:
- In Visual Studio, create a new Web Application. Call it “TryOutMVVM”, and enable MVC, Webforms and WebAPI in the setup (ignore the test project, we won’t use it here.)
- Modify _Layout.cshtml with contents (see zip file)
-
Add a TryOut.cs class in Models folder, and Ctrl-F5 to build. EF uses reflection so these periodic builds will be necessary.

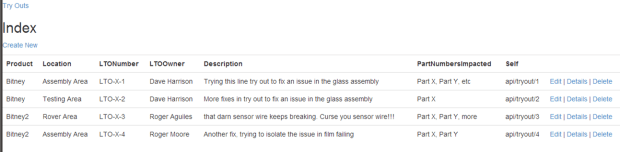
See above. This represents a single entity – a ID field, a product and location link (which in an actual application would probably be a related table with a foreign key), and some information about this try out. In this case, this represents a Line Try Out – an engineering change to a production line, including what part numbers are impacted, the person making the change and the description, the location and product it links to, and an identifying #.
-
Add a controller. Select MVC Controller with R/W actions Using EF. Call it HomeController; use the Contact model class, and select a <New data context>. Note, I got stuck on this a few times and couldn’t figure out what I was doing wrong – the code built, but I was looking at a blank response in Fiddler. Turns out I was selecting the wrong type of controller (kind of like Homer Simpson adjusting Marge’s camera with a drill and hammer. And, my mind just got distracted and a quick youtube search of that episode reminds me of how awesome that show really was back in the day. Ah, sorry, back to reality…) Anyway, and I can’t stress this enough, make sure you select the RIGHT kind of controller for this and the following steps!!! If you get an error message here it’s usually because you haven’t built the project yet (see #3 above) – Ctrl-F5 and THEN add the controller silly! I also usually delete the HomeController first, but go ahead and overwrite if you forget.


-
In the Tools menu, open up Package Manager Console. At the prompt enter:
- enable-migrations (since we have multiple contexts, enable–migrations -ContextTypeName
ContactManagerContext)
- add-migration-initial
- enable-migrations (since we have multiple contexts, enable–migrations -ContextTypeName
- Open up Migrations\configuration.cs, and add the code in the zip file. (this fills in the seed method to populate the database)
-
Back to Package Manager Console, enter: update-database
-
Here’s a sample of what it will look like in PMC. Check out the Migrations folder for a sample of what will be created:

And, as long as we’re here, check out Views\Home\Index.cshtml file. Notice all the work that EF handled for us in scaffolding actions:

-
- Build, Ctrl-F5. OHMYGAWDDIDTHISJUSTHAPPEN?!!!?!!
-
Replace index.cshtml with what’s in the ZIP file.
- Some comments. Notice this is plain and simple HTML5/CSS3. Very clean, really, for all it does. In a future version you’d want to move all those javascript functions out to a separate .js script. But this does work:
- Add a TryOut.css style sheet to the Content folder, and fill it with the styles in the ZIP. Again, nothing fancy here.
- Right click on the project and select Manage NuGet Packages. Search online and add a reference to knockoutjs. Now, look at the Scripts folder and see which version NuGet dropped in there – mine is 3.0.0. Make a note of this, you’ll need it for the next step.
-
Open up App_Start\Bundle.config.cs and add the following lines:
bundles.Add(new StyleBundle(“~/Content/css”).Include(
“~/Content/bootstrap.css”,
“~/Content/tryout.css”,
“~/Content/site.css”));
bundles.Add(new ScriptBundle(“~/bundles/knockout”).Include(
“~/Scripts/knockout-3.0.0.js”));
-
We’re actually almost there, can you believe it! Let’s add a service layer using WebAPI. Right click on Controllers and add a Web API Controller with R/W actions Using EF. Call it TryOutController. Select TryOut for the model, TryOutMVVMManager context.


note, there’s no Views created for this – since its web aPI. All the API calls are right there in our TryOutController.cs method headers.
All that’s left is the building and the screaming. Let’s build it, Ctrl-F5.

Check out the new Home controller, at {yourappurl}/api/Contact.

Have some fun with it. Try
http://localhost:58149/api/Tryout
http://localhost:58149/api/Tryout/1
(where the port # obviously is your URL). Wow!
Notes and Links
I’m not done yet. I want to do some more research about the Repository pattern and how to do Web API the RIGHT way. I think I need to spend more time thinking about the design pattern and get out of the database-first box.
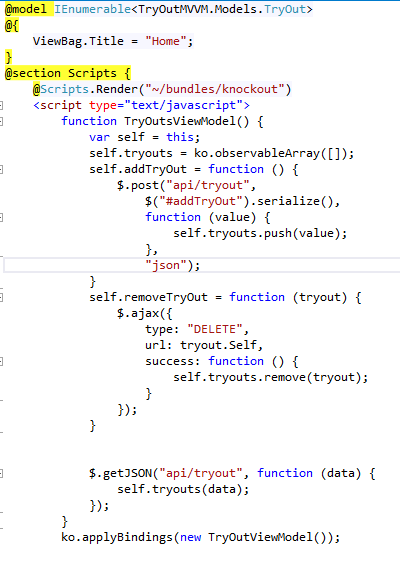
Next, for the frontend, I want to start thinking about KnockoutJS and the MVVM model:
 f
f
The single best example – used as a base for this posting: https://www.windowsazure.com/en-us/develop/net/tutorials/rest-service-using-web-api/#bkmk_createmvc4app
A long post based on a single example, with CRUD operations. I like this ahead of the ones below, for ease of use. http://www.asp.net/web-api/overview/creating-web-apis/creating-a-web-api-that-supports-crud-operations
A good walkthrough to get started: http://www.asp.net/mvc/tutorials/getting-started-with-ef-using-mvc/creating-an-entity-framework-data-model-for-an-asp-net-mvc-application – a student-enrollment-course many to many type relationship sample.
http://www.asp.net/web-api/overview/creating-web-apis/using-web-api-with-entity-framework/using-web-api-with-entity-framework,-part-1 – this is by Mike Wasson, who created the excellent Movies web api sample. This is more of a master/detail page view creation. It’s excellent because it also goes through KnockoutJS, and has a section on using Web API with webforms.
I need to add user authentication and roles – this article contains some great info on hooking up users/roles.
Jason Zander’s blog post – has a nice walkthrough on the Web API: http://blogs.msdn.com/b/jasonz/archive/2012/07/23/my-favorite-features-entity-framework-code-first-and-asp-net-web-api.aspx
Best example I’ve seen yet on Web API – including the otherwise excellent MVC book by Apress – is this post: http://www.dotnetglobe.com/2012/03/crud-operation-using-aspnet-web-api-in.html
See the MSDN article here on Single Page Applications and MVC vs MVVM.
Another article on Web API and how it could be used vs WCF Data Services – http://msdn.microsoft.com/en-us/magazine/dn201742.aspx
